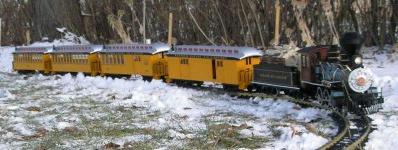
I started out with track just laying on my deck and shortly after that on the grass. A recommendation in a Getting Started book said get some track down and start running trains. Good idea. Dream a little and think about what you want for a layout. So I did.
The Road Bed Material
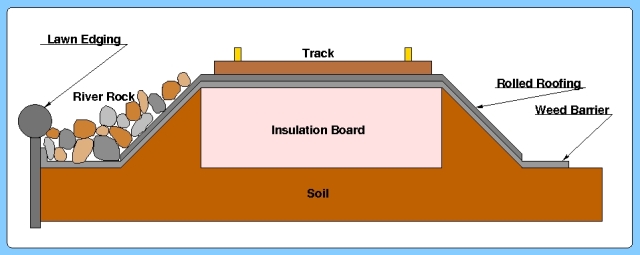
Then the time came to start building a permanent layout. I read about different types of road bed from gravel filled trenches to concrete to elevated layouts on lumber or plastic. Now that I knew the cost of brass track I started thinking about the cost of the roadbed. I wanted something durable yet relatively inexpensive. I had done some HO modeling and knew about cork roadbed and styrofoam insulation for scenery. That must have been the seed that sprouted into the thought of using stryofoam insulation for the garden railroad roadbed. Ultraviolet light degrades most plastics so I knew that the styrofoam would have to be covered with something. Hmmm, what should I use. The thought of rolled roofing came to mind. It seemed like it was worth a try.
I decided to use 1-1/2 inch thick styrofoam. That decision was based partly on cost (about 15$ per sheet when I started in 2006, now in 2014 it is closer to 20$ per sheet) and partly on strength. Find a construction site where they are using it and see if you can get some of the big scrap pieces if you want to save some dollars and keep the scrap out of the landfill.
Cutting Straight Sections
The track plan was laid out on the ground using a garden hose. You can build in easements for the curves as you lay out the hose. I cut strips of foam just a little wider than the ties. Straight sections were easy to do. A long bladed knife works ok for cutting. Use a sawing motion but let the blade to the work. I also use a thin, flexible hand saw which I think is better than the knife but a bit messier. A lawn vacuum sucks up the foam saw dust easily. A power saw will make a huge mess with tiny foam pieces all over. (Guess how I know that.)
Cutting Curved Sections
Initially curves were made from straight sections with cut notches into the foam so that it could be bent. The foam is a bit on the brittle side and often cracked or broke into short pieces so that did not work real well. I no longer do that. Instead I made a template from cardboard and used that as a pattern for cutting the foam. Put a mark on the top side of the template. You will find out why later. Tin snips work good for cutting cardboard as does a utility knife. If you are a clutz with any tools either learn how to handle them properly or get competent help. This is your safety warning.
The foam was laid using butt joints. After it was in place, adjacent pieces were fastened together with 16d common nails pressed into the foam diagonally across the joints. I also ran some nails through the foam into the ground below so it would not shift. Then I banked up soil against the foam to form a real railroad roadbed-like profile. I have moved some track and found that the soil will stick to the foam after a while holding it in place. Nails into the ground are no longer used.
Prepare The Ground
Spend plenty of time getting the surface of the ground ready for the roadbed. Make it smooth and pack it firm. I used a both a 2ft and a 4ft metal level for smoothing and checking the grade. (I now have a level with a digital display that will report the grade as a percentage or an angle. It is sold by Sears, the only thing I ever bought on Black Friday because it was 50% off.) Sliding the level on the soil wears the paint off but this is not a big problem. Use a straight board if using a level bothers you. A block of 2x4 wood about 6" long works good to smooth and pack the soil.
The first loop of track that was laid around the pond was laid directly on the existing grass. The grass under the roadbed died and decayed. As I laid more track I either cut the grass away down to soil level or in some areas either added soil on top or cut into the sod to get the proper grade, cut and fill as the prototypes do.
The weed barrier, AKA landscape fabric, may not be necessary, but it made me feel better using it. I started cutting it in strips to lay along each side the track. I later found it was easier to use a single wider piece going all the way under the roofing instead of using 2 pieces.
The "Ballast" - Rolled Roofing
Some people have gone to great lengths of use prototype-like ballast. I have taken the Monet approach. Something that gives the impression of ballast without all the detail, cost, installation, and maintenance. Rolled roofing is best installed in warm weather so the sun can warm the material. Unroll it in a sunny place with the black (back) side up. After warming cut it and lay it in place. It conforms to the roadbed profile more readily when warm. The roofing pieces are simply overlapped at the ends by a couple of inches. The tracks span overlapped areas without any problems. Butt joints could be made but would take careful cutting. If the roofing shrinks or moves a little the joints would open. Not an issue with lap joints. Butt joints would also provide a place for weeds to grow.
Handle the roofing carefully as it cracks if bent too sharply, especially when cold. I did install some successfully in late November with a little snow on the ground. There was not much warmth from the sun so I used a propane torch to warm the roofing. It's tricky to do that. Keep the torch moving over a large area so you don't overheat and melt the roofing. Relief cuts on the inside of curves are often necessary. Make them as needed. I have not needed any on the outside of curves.
As with the foam, straight sections are easy. The rolled roofing pieces were cut about 9 inches wide, a convenient width since the roofing rolls are 36 inches wide. A long straight board makes a good cutting guide. Lay it on the black side and cut with a utility knife. Make multiple passes with the knife rather than trying to cut all the way through the roofing in one pass. The longest piece I could easily handle alone is about 8ft.
The cardboard templates for the foam curves were also used for cutting the rolled roofing. Invert the template (you know which side is up because you marked it earlier) and lay on the black side of the roofing. My templates are normally about 4in wide, the length of the ties. Draw a line about 2-1/2 to 3 inches away from the edge of the template on both sides. I used a piece of yellow carpenters chalk for drawing. It is easy to see. It is also easy to find after it falls into the grass. I made dashed lines first, moved the template out of the way and filled in the line. A precise curve is not critical. Again cut the roofing with a utility knife making multiple passes.
From a distance (the 10 foot rule applied) the roofing looks a lot like ballast without the hassle of ballast. It does not wash away. It will not get into your switches. Most of the track has 1-1/2 inch river rock along side of it. It holds the roofing in place and adds a hint of ballast. Crushed rock would look more like ballast but around here is costs more than river rock. This size is large enough that my yard vacuum does not pick it up and the blower does not move much of it either.
Trackwork
The track I used is all Aristocraft 5ft straight track, code 332 brass rail. No sectional curved track was used. I made my own curved track from the straight track. A fairly simple task which is described below. The track sections are joined with either rail joiners or rail clamps. the rail joiners are supplied with Aristocraft track as are screws. Screws are embedded in wax in the underside of one of the ties in each track section. I have used both Split Jaw and Aristocraft clamps. I have only one power feed to each loop. Yes, there is some voltage drop but it is not a big problem. Some day I may add a second power feed to each loop.
Flex track is available but at the time I started, 5ft straight track was less costly than 8ft rail and ties purchased separately. The longer rail does have the advantage of fewer rail joints. To bend the 5ft straight track turn the track over and remove all of the tie-to-rail screws from the rail that will be on the outside of the curve. Then with a saw or wire cutters cut the plastic web between every other tie on the outside rail. There are 5 tie strips on each 5ft length of straight track. If you have a 2-rail track bender available use that to bend the track to the desired radius. I did not have one at the time so I bent the track by hand by carefully flexing it in the desired direction a little at a time until the desired bend was achieved. Some times I laid the track on a flat surface while bending, more often I just held it in my hands. Some folks bend it around their belly. Bending your own track is easier than trying to figure out how many and which sizes of sectional curved track pieces are necessary. Make the track fit the plan instead of making the plan for a certain size curved track.
The length of the curve along the outer rail is longer than the inner rail. As the rail is bent the outer rail end slips out of the ties. On the next piece of track, I slid the rail along its ties until it butted to the previous rail. Where both ends of the rails had screw holes, I put in rail joiners with screws, no grease used. (Some brands of track, like LGB, do not have screw holes in the rails or rail joiners. They expect you to buy their curved track.) The joints end up being staggered which is just fine. Where the curved track meets a straight section of track, a rerailer, switch or crossing both ends of the rails have to be even which means a length of rail has to be cut. I used a very fine tooth (32 tpi) hack saw to make the cut, then filed the end smooth. A clamp was used at such a joint as cutting the rail removes one of the screw holes.
I tried drilling and tapping some new screw holes. Some were successful, some not. I did break a couple of drills and taps doing this. The screws are only 2mm so it's tiny stuff to work with. Clamps add to the cost but save a lot of time and work. Sometimes I had to cut a tie to get the rail joiner or clamp in place. Here is an important tip for inserting the screws: Dip the end of the hex screwdriver into some vaseline and then put the screw on the screwdriver. The vaseline holds the screw on the screwdriver so it does not fall off before you get in inserted into the hole. Early Aristocraft track had Philips head screws. Be aware of these if you acquire some used track. I do not use these screws outside.
There are some grades in my layout but they are quite gradual so nothing special was needed to accomodate them. The track does not bend vertically very well so make a long transition from level to grade.
The track is held in place with 1-5/8in dry wall type screws, also called construction screws, run thru the ties and into the foam every few feet. The curves are allowed to float to compensate for expansion and contraction of the metal due to temperature changes where the track is in full sun. I have not used any of the commercial expansion joints yet. The only long straight sections I have are 100% shaded so expansion is not an issue there.
I had a couple of joints end up inside tunnels. I used Split Jaw clamps in these locations as I think that they hold more securely than rail joiners. Aristocraft clamps were not on the market at the time I built the tunnels.
Longevity
The first loop was laid in July, 2006. The original roofing is still in place and looks good as of July, 2014. There are some places where the ground has settled or raised (thanks to Mr. Gopher or his friend Mr. Mole as well as a few mis-steps by humans and also weather - frost heave maybe.) so someday I'll have to remove the track and roadbed and do the necessary regrading. I will replace the rolled roofing only as needed. I have some on hand left over from a real roofing project. I have found a few rail joiners have broken over time, probably due to weather. Where this has happened I replaced them with clamps. I do check all joint screws to make sure they are tight probably every year or two or if there seems to be an electrical continuity problem with the track power. Sometimes the screws get loose.
Sources of Materials
Track is available from new company Polk's Generation Next which has taken over the old Aristocraft line. Aristocraft is no longer in business.
Split Jaw clamps are available from Split Jaw Products and various distributors. Be sure to get a 6inch ball end, hex screwdriver from them too. Put a piece of plastic tubing over the shank or wrap it with electrical tape. It's a little protection in case you use it while the track power is on.
Insulation board comes in 4ft x 8ft sheets. I got mine at Menards. I used 1-1/2 inch thick, other thicknesses are available. Other home centers carry it also.
Rolled roofing comes in 3ft x 36ft rolls. I got mine at Menards (151-1624). It is called white but is a light gray. Other home centers carry it also.
|
![[ pfa ]](/banner/banner-left.jpg)
![[ acrr ]](/banner/banner-railroading.jpg)
![[ Home ]](/images/home.png)
![[copyright date]](/images/copyright.png)
![[Foam roadbed laid around pond]](p20060713-0012tn.jpg)
![[First loop completed]](p20060715-0033tn.jpg)
![[Alville Loop under construction]](p20060810-0064tn.jpg)
![[Testing the trackwork]](p20060810-0071tn.jpg)
![[Another test]](p20060810-0083tn.jpg)
![[Rocks at work]](p20061122-0008tn.jpg)
![[River rock in place]](p20070712-2908tn.jpg)
![[Wood chips along one side]](p20070715-2979tn.jpg)
![[Behind the train shed]](p20070717-2993tn.jpg)
![[The north loop]](p20070717-3005tn.jpg)
![[2 track siding]](p20090707-4940tn.jpg)
![[No ballast used]](p20071104-4234tn.jpg)